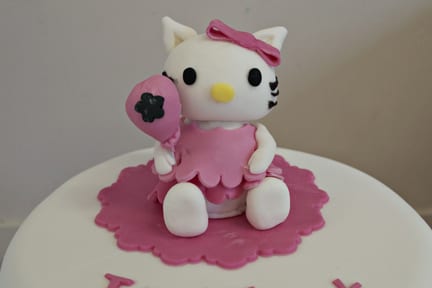
After the success of the gruffalo tutorial, I wish to present another ‘How to’ tutorial – How to make a fondant Hello Kitty cake topper again using a creme egg middle.
I have had a few people asking what to use if creme eggs are not available (normally between August-January) – I would use a mini Milky Way or Mars Bar.
Firstly cover the creme egg in sugar glue then wrap around with a thin layer of white icing – this is going to be covered in a dress later so it doesn’t have to be too neat. Try to make the seam either underneath or at the back though. Sit the covered body on a flattened blob of white icing to steady it.

Roll 2 large malteser size into short sausages and flatten down one end to make a foot and leg shape.
Roll a really large oval shape and attach to the body for the head – at this point your model might look a bit like one of those Alessi characters.

Small yellow dot for nose. 2 slightly larger oval dots for eyes. I used a black squeezy icing tube for the whiskers but a black icing pen or very thin black sausages would do just as well. I added a pink bow to her head but some Hello Kitties have a flower or even a heart.
For the dress I used 2 layers of pink icing, one darker than the other. I used a scalloped circle cutter to cut out the round dress (a large scone cutter would do too) Cut a circle out of the middle of the dress (makes it easier to wrap around – I used a small carnation cutter but a small plain circle is just fine). I made the top dress layer slightly paler but experiment with whatever colours you like.

For the arms, I made 2 small sausages of white fondant with one end flattened and rounded to make a hand shape – I then cut a small triangle out to make the thumb.
The ears are made by rolling 2 small malteser sized balls into flattened triangles – press the end of a paintbrush sideways into each ear and roll slightly to flatten out. Cut the ends so there is a flat surface to attach to the head.

At this stage, the topper is finished but I always think a cake topper is slightly better if they are doing something – reading a book, holding something, eating cake. I was really short of time so made an icing balloon for her to hold.
Get a really strong florist wire (I used an 18 gauge) – Bend the end over into a loop (pliers probably needed for this)

Roll a large malteser ball and mould into a blunt point at one end. Roll a tiny ball and flatten then indent markings into it with a cocktail stick. Dip the wire in sugar glue and push in from the top of the balloon. Smooth over the top where the wire has left a mark and attach something to pretty it up – I used a little flower but you could use a heart, number or initial. Insert into the cake topper going through the leg to steady it.


Looks amazing – love the finished article with all the cupcakes too!! V clever 🙂
Thank you – the cupcakes went down a treat!