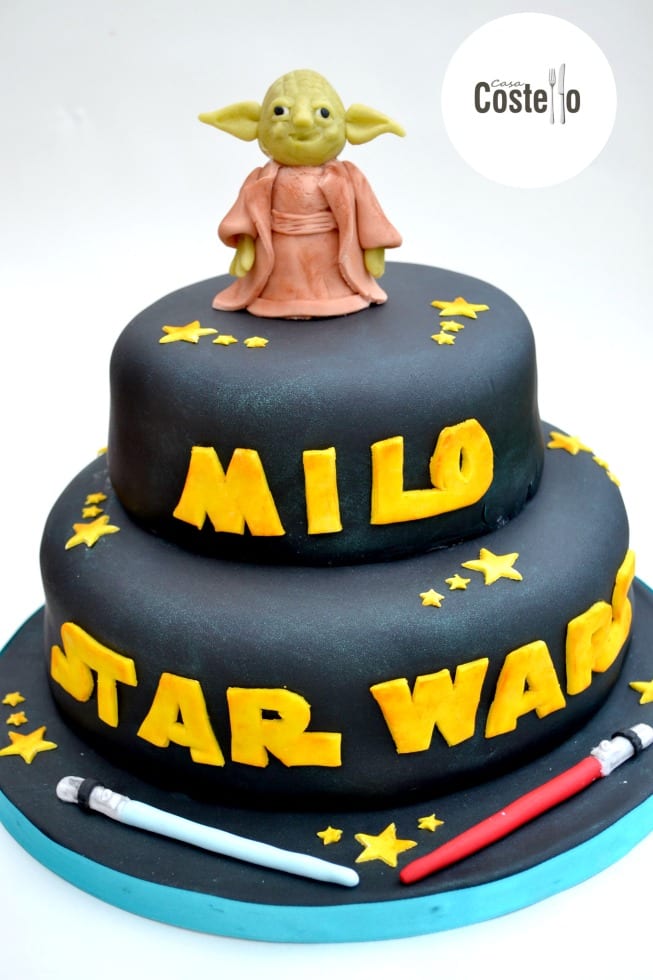
I may not take cake orders anymore but it doesn’t mean I don’t enjoy having a play. My 7 year nephew is a huge Star Wars fan and celebrated his birthday party at the weekend. I offered to make him a cake as he tends to miss out, having a 28th December birthday. We were planning on adding Lego Star Wars characters but at the last minute I decided to make a Yoda Cake Topper using my favourite Walnut Whip as a base. I’ve talked several times about how Walnut Whips and Creme Eggs are the perfect foundations for cake toppers as they hold the shape so well (and frankly taste much nicer than solid icing).
As always, I try to make my cake toppers with as little equipment as possible – Not everyone has a kitchen full of cake decorating stuff. If you have any questions about my cake toppers, feel free to ask. He’s not perfect but hopefully he’s a start for anyone wanting to try their own … and he made us smile!
I’m happy to try and tutorials that I’m asked to do – So far I’ve been requested to make a sheep so watch this space.
I’ve linked to more of my tutorials at the bottom of this post.


Firstly, take off the walnut if you are using a real Walnut Whip & not M&S’s version (which are a bit smaller btw). Cover in edible glue (I use an 1/8tsp tyro powder to 3tsp water)

Colour white fondant using Chestnut Edible Art Gel colour.

I add a ball of marzipan to the top of the walnut whip to make it a bit taller (don’t forget to then brush more edible glue over this)

Roll out enough coloured fondant to cover the whole walnut whip – only needs to be quite thin.

Cover the walnut whip and smooth down. I know mine is very untidy. Most of it is getting covered and I wanted to show the finished cake topper could be made in under an hour. (Feel free to fall about laughing about the shape of this picture)

Roll out more fondant and cut a shape like below. The scalloped part will be around his neck. Brush more edible glue around the top of the walnut whip and down the sides where his coat will attach.

Quickly wrap the fondant coat around the walnut whip. You need to work quickly as the fondant dries out and cracks really easily. Fold back the lapels.
If the coat is slightly too long, trim using either a knife or scissors.

I added some detail by rolling out 2 thin strips of fondant and adding to the base and waist. Score the markings using a knife.

If your cake topper is going to be traveling any distance, you might want to insert a dowel at this point. I was transporting mine 60 miles later that day so wanted to make sure the head didn’t fall off. I probably wouldn’t have bothered if the party was local. Some people use cocktail sticks or wooden BBQ skewers as dowels – This is not considered to be food safe as splinters can detach.

Colour some marzipan (or fondant if that is all you have) with Gooseberry green Edible Art Gel Food Colour. I use marzipan as it sticks to itself really well and any markings show up great too. Roll into a ball, then make slightly oval shaped and attach to the body.

Insert the pointy end of a small rolling pin (or paintbrush) to make the indents for eyes. (See the ears collage below for the rolling pin I use).
EYES & NOSE
See pictures below:
Roll 2 small cones of white fondant icing for the eyes and insert.
Roll a small green cone of marzipan for the nose and attach (I later smoothed down the edges of the nose to disguise the joins).
Make an indent for a smiley mouth using either a sugarcraft veining tool or a cocktail stick/paintbrush if you do not have one.
Add 2 tiny dots of black icing for the centre of the eyes.

Yoda’s Face
Make him look older by using a veining tool or the end of a paintbrush for markings.
Add 2 small dots of green marzipan for cheeks and smooth down the edge joins.
Roll 4 tiny sausages of green marzipan and attach under and over each eye. Again smooth down the joins to disguise the edges.

Yoda’s Ears
Roll 2 cones of green marzipan for his ears and flatten down one end. Attach at a right angle to his head using a tiny amount of edible glue. If you use too much glue they may slide downwards.

Yoda’s Arms & Hands
2 Larger balls of Chestnut fondant & shape into cones. Insert the end of the small rolling pin and rock backwards and forwards until the arms start to hollow out. I chop of a sliver at the side of each arm to thin out the tops. Attach the arms with a tiny bit of edible glue.
Roll out 2 small cones of green marzipan for hands and flatten down on end with your finger. Using scissors or a small knife, make 2 cuts for fingers. I pinch together the ends of each ‘finger’ to make them more pointy. Attach in the end of each arm.

To finish Yoda off, I brushed him with some brown dusting powder and some pale green edible shimmer. He traveled in a shallow tupperware box with no lid and I sat him on the cake at the venue.

Some of my other cake topper tutorials:
How to make a Peppa Pig Cake Topper
How to make an edible Gruffalo Cake Topper
How to make a Hello Kitty Cake Topper
I’m happy to be organised enough to join Jenny over at Mummy Mishaps for this week’s #BakeoftheWeek (She’s open until tomorrow night if you fancy joining in?)


Your a great aunt for making your nephew a cake this detailed! I’m sure he enjoyed it very much.
The lightsabers were a nice touch as well.
Helen you are so clever and you make it seem so easy, but alas I fear that if I were to attempt this it would be less Yoda and more Shrek, and even then less Shrek and more a green blob LOL!
It is a brilliant cake – I bet the birthday boy was chuffed to bits. xx
thanks for linking to #Bakeoftheweek x
OMG, that is the cutes Yoda ever!! This tutorial is so easy, I think even I can do it…my kids would love this.
oh we had a Yoda cake for our star wars themed birthday party but I admit I paid to have it made I wish I had seen this sooner could of saved me a small fortune
Oh wow you are so talented! That looks amazing! I am so useless at cake decorating, I am really impatient and clumsy! My kids would love this!
OMG. This is amazing! You’re so talented. I hope this post goes viral for you 🙂
This is seriously impressive!! What a talent and looks so good too. I wish I could do this x
Oh my god this yoda is absolutely amazing. I’d love to make something like this for my boyfriend as he’s a huge star wars fan but I don’t know how good it would turn out x
Oh wow!! Yoda looks SO adorable! I’ve always wanted to have a go at sugarcraft – I’d probably be awful at it though, as it’s definitely a real skill! 🙂 xx
Ah what a fab cake! Brilliant tutorial and Yoda looks amazing 🙂
Awww, the little yoda looks adorable! And it doesn’t look that hard to make either. I like that you used a walnut whip for the body and it’s not entirely out of marzipan.
this is amazing! We are thinking about watching Star Wars with our little boy for the first time this weekend! x
What an amazing looking cake – and I bet it tastes good too. I am absolutely useless at decorating cakes.
Wooooow! Seriously??! This little yoda looks absolutely amazing. Perfect for a cake topping and so creative 🙂
Oh wow that Yoda is awesome! You’ve done such a great job xxx
You make it seem so easy! I think you did a wonderful job making Yoda! It’s really awesome and any fan would appreciate a cake this cool!
Wow, This really looks so cool and cute I would love to try this too for my son’s 4th birthday. You really did a good job
This looks fantastic! I may just steal your idea next time my kids ask me for a Star Wars birthday cake.
The cake looks amazing. I really like the Yoda that you made too
How do you make it look so easy! I love seeing the process behind this and knowing that there’s a big chunk of chocolate inside this yoda just makes him look tastier!
This is so amazing, I wish I was as creative with baking as you are. I’m allergic to nuts so wouldn’t be able to use a Walnut Whip but could I substitute this with the Creme Egg like you mentioned?
I have just started baking again and loving it. My next mission is to attempt a cake. I cant get over how amazing this looks and the fab tutorial on how to make the cake topper 🙂 awesome skills